
Hearing the words “AI” and “automation” in the same sentence often evokes fear, but it doesn't have to.
As the workforce wrestles with how to cope with the potential automation of jobs and even whole industries, many workers overlook the daily benefits of automating everyday tasks with AI. When highly skilled workers understand the limits and capabilities of AI, using it in their daily work improves their performance 43% more than colleagues who don't use it, according to a recent study.
That's where Microsoft Copilot and Designer come in. Copilot is a multi-purpose chat tool that integrates seamlessly into existing Microsoft apps, helping you automate repetitive tasks and generate engaging content in no time. And visually bringing your creations to life couldn't be easier thanks to Microsoft Designer, an AI-powered graphic design app that allows you to generate and edit images and create designs for social media posts, holiday cards, invitations, posters, and more.
In this article, we'll show you how to use Copilot and Designer to save time and create high-quality creative work.
Generate and edit high-quality images with Designer
Finding free, high-quality images for presentations and social media content can be a drag. And although sites like Unsplash and Pixabay offer a variety of modern free and paid professional stock photos, it can be hard to find images that meet your specific use case.
Microsoft Designer allows you to generate bespoke professional images with nothing more than a short text prompt. You can also refine and customize images exactly to your liking using a variety of simple prompting techniques, making Designer an excellent tool for creating brand-consistent content.
Let's say we're tasked with creating a presentation that illustrates, at a high level, how an AI model is trained. For this, we'll want to generate three different images that represent the different stages of the model training process:
- Data cleaning
- Model training
- Model evaluation
Steps
1. Pick a theme or style for the images you wish to generate. Choose a style you can use consistently in all your image prompts.
2. Open Microsoft Copilot and enter a prompt to generate your desired image. The more specific the prompt is, the better the output will be. Our first image will represent the data cleaning process.
Prompt: Generate an image of a stack of papers with a sponge in the corner of the desk.

3. The above prompt generates the following images to choose from:

4. After selecting our preferred image, we’re now going to edit it using inline editing.

5. You’ll notice several options to customize the photo style at the bottom of your image. You can also hover your mouse over the elements that you would like to change within the photo, i.e. color change, blur background, or resize the image.
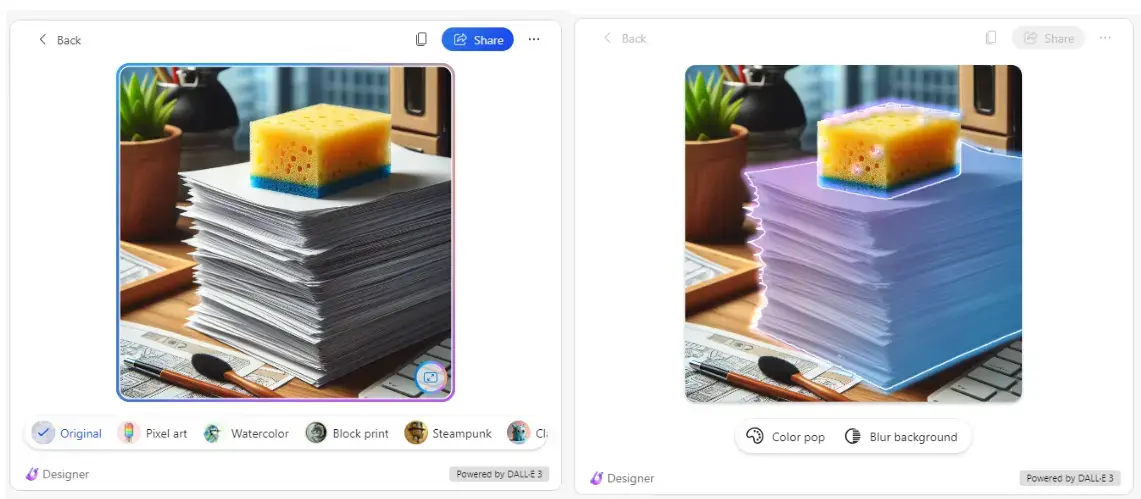
6. Here we are going to change the image to Pixel art style.

7. Now, we repeat these steps for the other two images we want in our design. Remember, these next two images should represent model training and model evaluation, respectively. Note how I'm adding some of the main colors from the first image to the prompt to make the graphics consistent.
Prompt: A pixel art image of a gear, representing a model undergoing the training process, with arrows over it indicating that it's turning in a clockwise direction. Use these colors in the design: 8fdfe9, f4e4c0, 75959d, 0e101b.

Prompt: A pixel art image of a small atomic-like structure, representing a model, that's being examined under a microscope. Use these colors in the design: 8fdfe9, f4e4c0, 75959d, 0e101b.
We now have three images, customized to our specifications and featuring consistent styles and colors, to represent the AI model training process. We can now use these in our presentation and add them to other documentation and marketing material as needed.

Tips
- Include a specific image style in your prompt (e.g. photorealistic, minimalist, pop art, comic strip, pointillism, material design, flat vector).
- Use a chatbot like Copilot or ChatGPT to help you create or edit image generation prompts.
- Refine your images iteratively, using prompts such as “now use [specific color palette], ˮ “great, but make [item] bigger and more detailed “replace the background with [desired new background].ˮ
- Keep image styles consistent by using prompts like “in a similar style, generate [new image],ˮ “with [color palette] and [brand theme] create [new image].ˮ
Create professional social media content with Design Creator
Maintaining consistent branding across social media content can be challenging, especially when you need to create and publish content quickly. Microsoft Designer’s Design Creator allows you to generate social media posts, ads, invitations, posters and other graphics with a simple text prompt and refine your design in a user-friendly graphics editor.
Designer also lets you create your own brand kit so you can maintain brand consistency across your content. If you need help creating a brand identity, you can generate a brand kit with a text prompt and further refine it on your own. Otherwise, Design Creator will suggest colors and fonts to include in your brand kit based on any existing designs or images you've already created.
To demonstrate how to generate consistent social media content with Design Creator, we'll create a simple Instagram post announcing an after-work meetup for queer people in tech. We'll generate the post with a prompt, edit the post in the graphics editor, and briefly create a few brand assets for future use.
Step by step: Creating a social media post
1. Open the Design Creator and enter a descriptive prompt for creating an Instagram post.
Prompt: Create a Swiss-style graphic for an Instagram ad, focusing on strong, readable typography and a strict grid layout. Incorporate high-quality photos of tech environments, accented with rainbow colors for a modern, inclusive vibe.
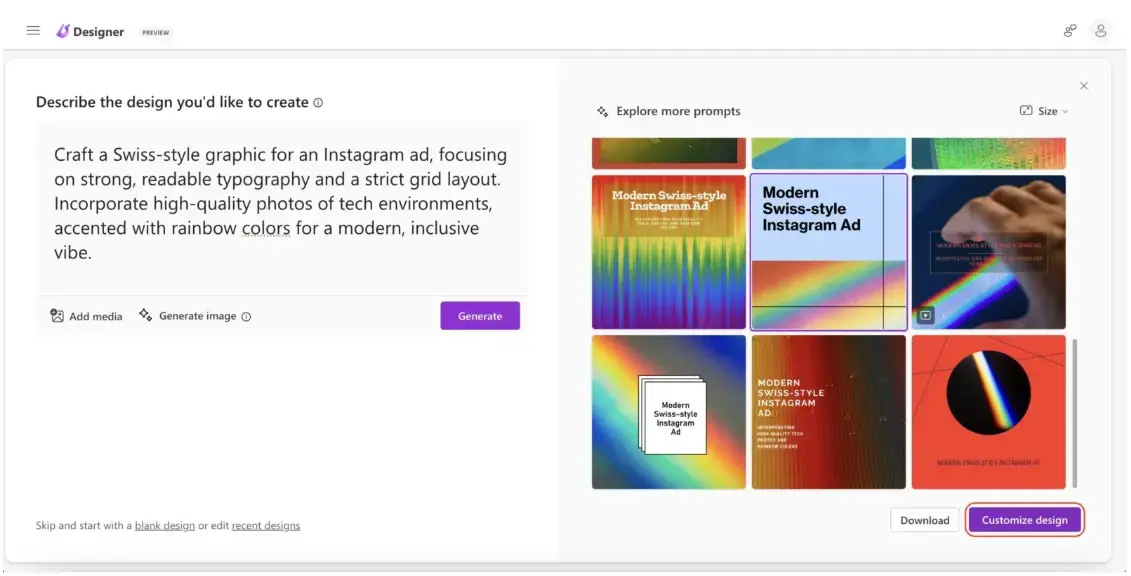
2. Designer will return a selection of designs that address your prompt. Choose the design that best aligns with your vision.
3. When you select a design, it will automatically open in Designer's graphic editor. You can click on the Brand Kit button and select Get Started to generate a brand kit from a prompt, or you can choose a pre-selected brand kit. For this example, we’ll choose a pre-selected brand kit.

4. Use the design options to edit your post. You can also create a template with a heading, subheading, and body text that can be used for future posts, and isolate the rainbow image so it can be used in future branded content.
Our result is a set of three professional-quality graphics that can be re-used and re-formatted for future posts.

Conclusion
Using AI tools like Microsoft Copilot and Designer can enhance everyday creativity and productivity by automating tasks and rapidly generating high-quality content. Copilot integrates seamlessly into Microsoft applications and can be used to generate bespoke professional images using just a prompt, while Designer allows you to create and edit social media content with ease. As is the case with many creative tasks, AI tools can serve to augment and streamline our capabilities rather than replacing them, allowing true creativity and decision-making to rest in human hands.


