For many of us, our pets are our world. We're the proud parents who fill our camera rolls with countless photos of our furry friends, documenting every adorable yawn, stretch, and mischievous moment. It's only natural that we want to celebrate our pet's unique personality and create something truly special with those photos.
That's where Microsoft Designer comes in. With its AI background remover and image creation tools, Designer makes it easier than ever to transform a simple pet photo into a magical portrait worthy of your four-legged royalty.
In this post, we'll walk you through the process of removing the background from a pet photo and replacing it with a custom-generated background that perfectly captures your furbaby’s spirit.
Step-by-step guide to creating a pet portrait
For this project, we’ll be using a photo of the best kitties in the world, Pan and Glen.

Step 1: Remove the background from your photo
- From the Microsoft Designer home screen, locate Edit with AI and select Remove background.

- Upload your photo and wait a couple seconds. Designer will show you its first attempt at removing the background from your photo.

- Did the background remover nail it the first time? Amazing! Move on to Step 2.
- Was part of the background missed? Use Generative Erase to remove it from your photo. (The background remover automatically connects you to Generative Erase after removing the background).
Within Generative Erase, you have two options: object select and brush select.
- Object select: Hover over an object and Designer detects its edges automatically.
- Brush select: Manually paint over the part you want removed. You can adjust the size of your brush and/or zoom in on the image to achieve the level of detail you need.
Consider starting with Object select, then use Brush select to clean up shadows and any other residue Object select may have left behind.
Now, back to Glen and Pan. After using Generative Erase to clear the background, we are here:

If we were sticklers for perfection, we could zoom in on the image and use Brush select to make the outline around Glen (the orange one) more natural and less stark.
And if we want our transparent kitties to be even more flexible, we could break them up into separate graphics. Here’s how:
- In addition to the previous steps, use Generative erase to remove the black kitty from the photo.
- Hit Download. Select PNG and check the box that says “Make background transparent.”

- You now have a transparent graphic of the orange kitty.
- Open a new tab and return to Designer’s Background remover. Re-upload your original photo and repeat the background removal process—except this time, remove the orange kitty and save a transparent PNG of the black kitty.
- You can now upload both transparent graphics to My media in Designer and manipulate them individually within your design.
Now it’s time to replace the background.
- Open Image Creator and write a prompt describing the background you want. (Not sure? In the next section of this post, “Pet portrait background ideas,” we list some ideas).
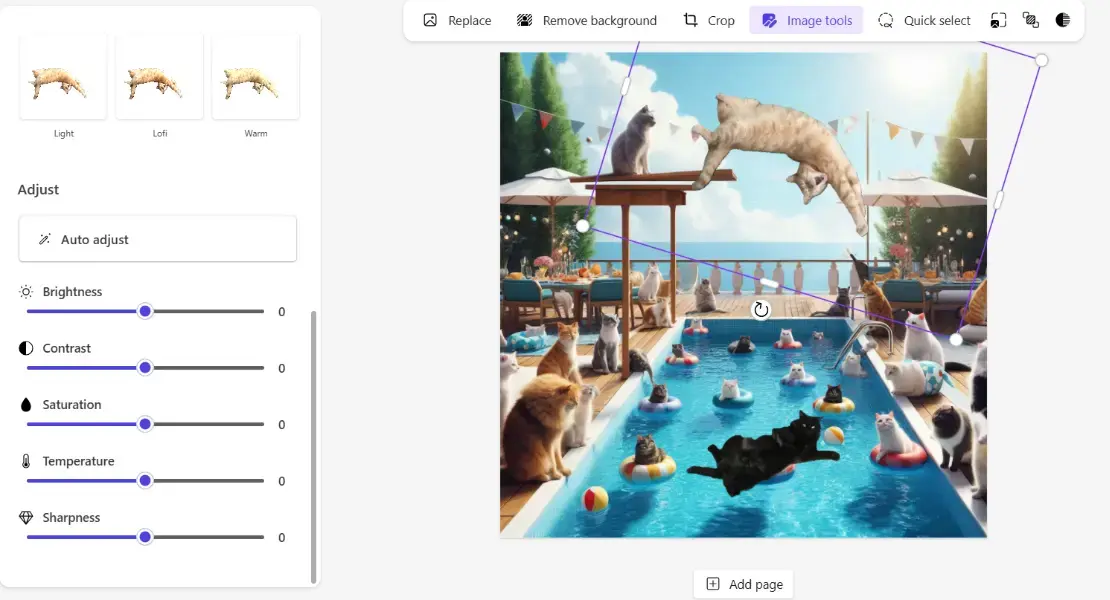
- For our kitty photo, we’ll draw inspiration from the way the cats are posed and set them at a pool party (because if there are two things cats love, it’s swimming pools and other cats, amirite?).

- Refine your prompt as needed until you find the perfect backdrop for your image.
- Select the image you want to work with and hit Edit to continue editing.
Our kitty pool party image is great. Let’s use Generative Erase to clear up more space for Glen and Pan.

- Navigate to My media and upload your transparent pet graphic(s) if you haven’t already.
- Add your pet graphic(s) to the image, adjusting their size and position however you like.

We love! Let’s just play with the saturation and contrast to help Glen and Pan stand out. Since it’s a surreal scene, we can get away with plenty of saturation.
- To do this, highlight the image so the toolbox appears, then select Image tools.
- In the box on the left labeled AI tools, scroll down until you get the Adjust section at the bottom. Toggle the settings to your liking.

The final result:

Glorious! It may not ever hang in the Louvre, but it’s a fitting tribute to two incredible kitties.
Pet portrait background ideas
When it comes to choosing a background for your pet portrait, the possibilities are endless. Here are a few ideas to get your creative juices flowing:
🏰 Fairytale wonderland: Transport your pet to a magical, fairy-tale-inspired setting with lush gardens, enchanted forests, or even a castle in the clouds.
🍂 Seasonal scenes: Celebrate your pet's favorite time of year with a background that captures the essence of spring, summer, fall, or winter. Think blooming flowers, sandy beaches, autumn leaves, or snowy landscapes.
🗽 Famous landmarks: Place your pet in front of iconic landmarks from around the world, such as the Eiffel Tower, the Great Wall of China, or the Statue of Liberty.
🎨 Abstract art: Create a modern, artistic portrait by pairing your pet with an abstract background featuring bold colors, geometric shapes, or unique textures.
🌟 Classic elegance: For a timeless look, opt for a simple, solid-colored background or a subtle gradient that allows your pet's natural beauty to shine through.
Give your pets the perfect portrait with Microsoft Designer
With Microsoft Designer's intuitive tools and a dash of creativity, you can transform an ordinary pet photo into a silly, heartfelt, or stunning work of art. By removing the original background and replacing it with a custom-generated one, you have the power to create a truly one-of-a-kind portrait that captures your pet's unique personality and charm.
Give Microsoft Designer a try today and create the magical portraits your pets deserve!
